Printing Custom Characters on a Character LCD
or How I drew the Simpson's Monkey
| Copyright: | Copyright 2007 Dean Hall. All rights reserved. |
|---|---|
| Author: | Dean Hall |
| Date: | 2007/06/19 |
Abstract
This article discusses how to overwrite bytes in the CGRAM to display custom bit-map graphics on a Hitachi HD44780-compatible character LCD display. A method is described of transforming a raster image to an array of values that are a monochrome bit-map representation of the original.
Background
There are many types of LCD displays available on the market. The least expensive and most prevalent is the NxM character display (N=number of lines, M=number of characters per line). The majority of these displays use a Hitachi HD44780 (or compatible) chip. This chip provides a common interface to print characters, move the cursor, shift the display and, most importantly for this discussion, create custom characters on the display.
Technical information on the HD44780 can be found using Google. Here is one example page that has what we need.
Description

All of my technical and robot projects fall under the umbrella of The Monkee Project. I chose as my mascot, the face of the monkey from The Simpsons television show. So naturally, I wanted a way to print the monkey on my LCD display.
I found a picture of the monkey using http://images.google.com. Then I took some graph paper and a print-out of the picture and rasterized the image by hand. That is, I filled in blocks on the graph paper closest to the lines of the image. Scaling was very important at this step. My title screen text uses thirteen characters on two lines, so I only had 2x3 characters remaining on my LCD for the image.
On the LCD, each character is 8 pixels high by 5 pixels wide and a 1 pixel space between each character horizontally and 2 pixels vertically. I got that from the LCD's datasheet. So, a 2x3 character area gives me 17x18 pixels. I used the "Scale %" option of the print dialog to scale the image print-out until it fit the 17x18 grid on my graph paper.
Once I had the rasterized image of the monkey, I grouped the 5 horizontal pixels and converted those to numbers to create the 8 bytes of bitmap data for each character. If you want to create your own graphics, here is a web-based tool to draw the graphic you want and it will give you the bitmap data you need.
Software
My character LCD is connected to two latches on the address/data bus of an Atmel ATmega103 microcontroller. One latch is for the 8-bit data bus, the other is for the other LCD control pins. Mine is a custom circuit and your circuit to drive the LCD will be different. However, you should be able to adapt the software for your needs.
Here is the function that prints my title screen:
void
mmb_lcdTitleScreen(void)
{
    uint8_t i;

    char *str1 = "MonkeeProject\1\2\3";
    char *str2 = "on MMB103v1? \4\5\6";
    char apubytes[] =
    {
         4,  3, 15,  7, 15, 18, 18, 14, /* Char1: upper left  */
        31, 31, 31, 31,  3,  0, 12, 18, /* Char2: upper center*/
         0, 24, 28, 30, 18,  2, 12, 18, /* Char3: upper right */
        30, 15, 30, 12,  6,  2,  1,  0, /* Char4: lower left  */
        22, 12,  0, 17, 24, 30,  1, 30, /* Char5: lower center*/
        22, 12,  4, 18,  2,  4, 24,  0  /* Char6: lower right */
    };

    /* Put Apu chars in LCD's CGRAM */
    mmb_lcdPutCtl(LCD_CGRAM(1));
    mmb_sleepms(1);
    for (i = 0; i < sizeof(apubytes); i++)
    {
        mmb_lcdPutByte(apubytes[i]);
        mmb_sleepms(1);
    }

    /* Lcd msg */
    mmb_lcdSetLine(0);
    mmb_lcdPrintStr(str1);
    mmb_lcdSetLine(1);
    mmb_lcdPrintStr(str2);
}
The important thing to note here is that I inserted binary characters into the C string at the tail 3 positions of str1 and str2 by using \1, \2 and so on. The binary values in the string must match the address in CGRAM where you store your custom characters. In my program, this is done by inserting the binary values of 1-6 into the C string and then calling mmb_lcdPutCtl(LCD_CGRAM(1)); which makes the subsequent 6 calls to mmb_lcdPutByte(apubytes[i]); write into the CGRAM starting at address 1 and continuing to 6.
Here are the support macro and functions that I used in the above function. (The exact values of LCD_CTL_LATCH, LCD_DAT_LATCH and my bits for E, RS and RW don't matter to you because your hardware circuit is different):
/* set CGRAM addr */
#define LCD_CGRAM(n)        (0x40 + ((n) << 3))

void
mmb_lcdPutCtl(uint8_t val)
{
    /* Handle control message */
    /* E = 0; RS = 0; RW = 0 */
    LCD_CTL_LATCH = g_mmb.lcdCtl &= ~(LCD_E | LCD_RS | LCD_RW);

    /* E = 1 */
    LCD_CTL_LATCH = g_mmb.lcdCtl |= LCD_E;

    /* Set data; E high for 500ns (2 instruction cycles should do) */
    LCD_DAT_LATCH = val;
    LCD_DAT_LATCH = val;

    /* E = 0 */
    LCD_CTL_LATCH = g_mmb.lcdCtl &= ~LCD_E;
}

void
mmb_lcdPutByte(uint8_t ch)
{
    /* E = 0; RS = 1; RW = 0; data */
    g_mmb.lcdCtl &= ~(LCD_E | LCD_RW);
    LCD_CTL_LATCH = g_mmb.lcdCtl |=  LCD_RS;

    /* E = 1 */
    LCD_CTL_LATCH = g_mmb.lcdCtl |= LCD_E;

    /* data; E high for 500ns (2 instruction cycles should do) */
    LCD_DAT_LATCH = ch;
    LCD_DAT_LATCH = ch;

    /* E = 0 */
    LCD_CTL_LATCH = g_mmb.lcdCtl &= ~LCD_E;
}

void
mmb_lcdPrintStr(char const *s)
{
    /* For each character */
    while (*s)
    {
        /* put character on screen */
        mmb_lcdPrintChar(*s++);
        mmb_sleepms(1);
    }
}
Results
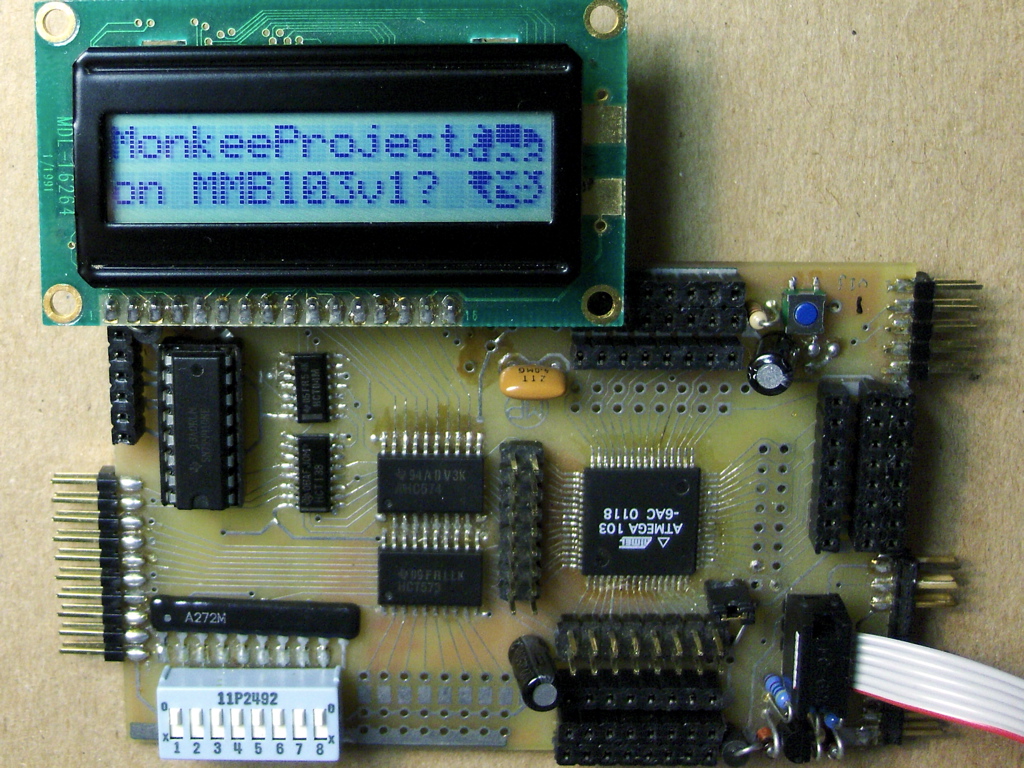
Here's a photo of my titlescreen including the image of the monkey on the LCD. Not great, but not bad for 17x17 pixels. And here's the original for comparison.